Antike Wunder der Händler von Unur: Unterschied zwischen den Versionen
Zur Navigation springen


(Die Seite wurde neu angelegt: „{{Template:Buildings}} ===Antike Wunder der Händler von Unur=== center ====Drachenarche==== Sobald du die Drachenarche geb…“) |
TiAnTi (Diskussion | Beiträge) |
||
| (7 dazwischenliegende Versionen von 2 Benutzern werden nicht angezeigt) | |||
| Zeile 12: | Zeile 12: | ||
[[File:GR12_AW1_main.png|center]] | [[File:GR12_AW1_main.png|center]] | ||
<br> | <br> | ||
=====Nutzen===== | |||
# [[File:Sg3up.png|30px|Geförderte wertvolle Erweckte Güter]] - Belohnt dich mit einer Menge von wertvollen Erweckten Gütern, sobald du eine Quest der Hauptstory gelöst hast; | |||
# [[File:Sg3up.png|30px| | |||
#[[File:Combining_Catalyst_1.png|25px|Combining Catalyst]] - Belohnt dich jedes mal mit Kombinationsauslösern, wenn du einMystischem Objekt aus dem Handwerk erhältst. | #[[File:Combining_Catalyst_1.png|25px|Combining Catalyst]] - Belohnt dich jedes mal mit Kombinationsauslösern, wenn du einMystischem Objekt aus dem Handwerk erhältst. | ||
* Runenscherben [[File:GR12_AW1_Runeshard.png|25px]] | * Runenscherben [[File:GR12_AW1_Runeshard.png|25px]] | ||
Mouse Over der Drachenarche zeigt dir Informationen zu Gebäude Status und aktuellem Bonus/aktuellen Boni. | |||
[[File:GR12_AW1_tooltip.png|center]] | [[File:GR12_AW1_tooltip.png|center]] | ||
<br> | <br> | ||
{{AncientWonders Level Benefits}} | |||
==== | =====Ausbau===== | ||
{ | {{Ancient_Wonders_Upgrade}} | ||
=====Ausbaustufen===== | |||
{| align=center | {| align=center | ||
!Stufe 1 - 35 | !Stufe 1 - 35 | ||
| Zeile 544: | Zeile 33: | ||
|[[File:GR12_AW1_5x4.png|200px|center]] | |[[File:GR12_AW1_5x4.png|200px|center]] | ||
|- | |- | ||
|colspan="6" style="font-size:12px;text-align:center;"| | |colspan="6" style="font-size:12px;text-align:center;"|'''Hinweis:''' Die Drachenarche hat in allen Levels eine Größe von 5x4 Feldern. Anklicken des Bildes zeigt eine vergrößerte Darstellung. | ||
|} | |} | ||
<br> | <br> | ||
| Zeile 553: | Zeile 42: | ||
[[file:GR12_AW2_portrait.png|center]] | [[file:GR12_AW2_portrait.png|center]] | ||
[[File:GR12_AW2_main.png|center]] | [[File:GR12_AW2_main.png|center]] | ||
=====Nutzen===== | |||
#[[File:SentientBoosted.png|Geförderte Erweckte Güter]] - Belohnt dich jedesmal mit einer Menge an zufälligen Geförderten Erweckten Gütern, wenn du etwas im Handwerk herstellst; | #[[File:SentientBoosted.png|Geförderte Erweckte Güter]] - Belohnt dich jedesmal mit einer Menge an zufälligen Geförderten Erweckten Gütern, wenn du etwas im Handwerk herstellst; | ||
#[[File:Royal_Restoration.png|25px|Royal Restoration]] - Produziert wöchentliche Restaurierungszauber. | #[[File:Royal_Restoration.png|25px|Royal Restoration]] - Produziert wöchentliche Restaurierungszauber. | ||
| Zeile 559: | Zeile 48: | ||
* Runenscherben: [[file:GR12_AW2_Runeshard.png|25px]] | * Runenscherben: [[file:GR12_AW2_Runeshard.png|25px]] | ||
Mouse Over dem Glücksorakel zeigt dir Informationen zu Gebäude Status und aktuellem Bonus/aktuellen Boni. | |||
[[File:GR12_AW2_tooltip.png|center]] | [[File:GR12_AW2_tooltip.png|center]] | ||
<br> | <br> | ||
{{AncientWonders Level Benefits}} | |||
==== | =====Ausbau===== | ||
{ | {{Ancient_Wonders_Upgrade}} | ||
=====Ausbaustufen===== | |||
{| align=center | {| align=center | ||
!Level 1 - 35 | !Level 1 - 35 | ||
| Zeile 1.084: | Zeile 63: | ||
|[[File:GR12_AW2_5x5.png|200px|center]] | |[[File:GR12_AW2_5x5.png|200px|center]] | ||
|- | |- | ||
|colspan="6" style="font-size:12px;text-align:center;"| | |colspan="6" style="font-size:12px;text-align:center;"|'''Hinweis:''' Das Glücksorakel hat in allen Levels eine Größe von 5x5 Feldern. Anklicken des Bildes zeigt eine vergrößerte Darstellung. | ||
|} | |} | ||
Aktuelle Version vom 10. Februar 2024, 15:00 Uhr
|


Antike Wunder der Händler von Unur

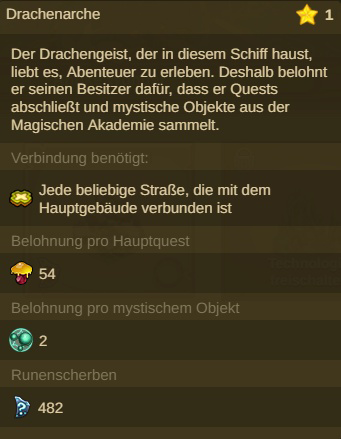
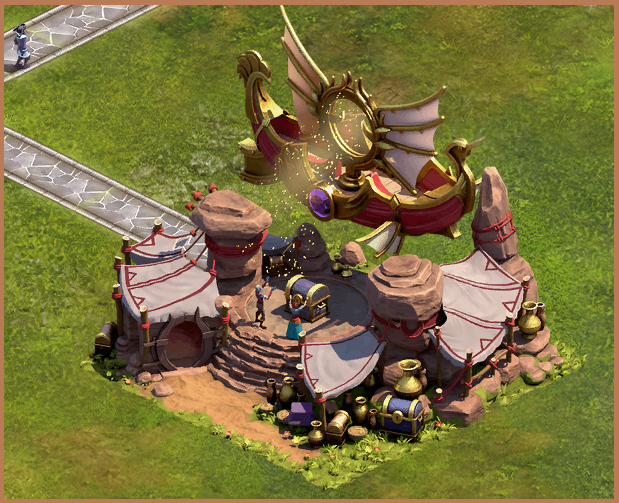
Drachenarche
Sobald du die Drachenarche gebaut hast, erhältst du ein neues Portrait, welches du in deinem Profil nutzen kannst!


Nutzen
 - Belohnt dich mit einer Menge von wertvollen Erweckten Gütern, sobald du eine Quest der Hauptstory gelöst hast;
 - Belohnt dich jedes mal mit Kombinationsauslösern, wenn du einMystischem Objekt aus dem Handwerk erhältst.
- Runenscherben

Mouse Over der Drachenarche zeigt dir Informationen zu Gebäude Status und aktuellem Bonus/aktuellen Boni.

| Hinweis: Mit jeder Ausbaustufe wird dein Antikes Wunder mächtiger und liefert mehr Nutzen für deine Stadt. Klicke auf die Registerkarte Stufen, dort wird dir angezeigt, welche Nutzen der jeweilige Level bringt. |
Ausbau
Für den Ausbau eines Antiken Wunders benötigst du die folgenden Ressourcen:
 Wissenspunkte - diese benötigst du, um jedes Level eines Antiken Wunders zu erforschen, jedes Level benötigt eine größere Anzahl an Wissenspunkten, d.h. je höher das Level desto größer ist die erforderliche Investition.
 Zauberspruch-Fragmente - diese benötigst du um die meisten Antiken Wunder auszubauen, je höher das Level desto mehr Zauberspruch-Fragmente sind erforderlich.
 Kombinationsauslöser - auch diese benötigst du um die meisten Antiken Wunder auszubauen, je höher das Level desto mehr Kombinationsauslöser sind erforderlich.
 Königliche Restauration - diese benötigst du für jeden fünften Level-Ausbau (in der Runen-Phase). je höher das Level desto mehr Königliche Restauration ist erforderlich. Ausgenommen hiervon sind die beiden ersten Antiken Wunder, die du im Forschungsbaum freischalten kannst.
| Bitte beachte: Jede Stufe eines Antiken Wunders erfordert Zauberspruch-Fragmente und Kombinationsauslöser als Ausbaukosten. Die Höhe der Kosten hängt von der zu verbessernden Stufe ab. Du kannst die Kosten in der Registerkarte "Ausbau" deines Antiken Wunders überprüfen. Jede Runenstufe (alle 5 Stufen) erfordert außerdem eine bestimmte Menge an Königlichen Restaurierungen, die wiederum von der Stufe des Antiken Wunders abhängt. |
Ausbaustufen
| Stufe 1 - 35 | |||||
|---|---|---|---|---|---|
 | |||||
| Hinweis: Die Drachenarche hat in allen Levels eine Größe von 5x4 Feldern. Anklicken des Bildes zeigt eine vergrößerte Darstellung. | |||||
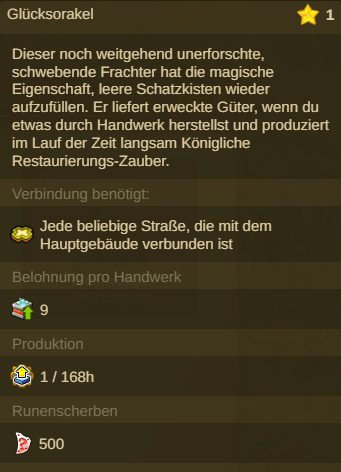
Glücksorakel
Sobald du das Glücksorakel gebaut hast, erhältst du ein neues Portrait, welches du in deinem Profil verwenden kannst!


Nutzen
 - Belohnt dich jedesmal mit einer Menge an zufälligen Geförderten Erweckten Gütern, wenn du etwas im Handwerk herstellst;
- - Produziert wöchentliche Restaurierungszauber.
- Runenscherben:

Mouse Over dem Glücksorakel zeigt dir Informationen zu Gebäude Status und aktuellem Bonus/aktuellen Boni.

| Hinweis: Mit jeder Ausbaustufe wird dein Antikes Wunder mächtiger und liefert mehr Nutzen für deine Stadt. Klicke auf die Registerkarte Stufen, dort wird dir angezeigt, welche Nutzen der jeweilige Level bringt. |
Ausbau
Für den Ausbau eines Antiken Wunders benötigst du die folgenden Ressourcen:
- Wissenspunkte - diese benötigst du, um jedes Level eines Antiken Wunders zu erforschen, jedes Level benötigt eine größere Anzahl an Wissenspunkten, d.h. je höher das Level desto größer ist die erforderliche Investition.
- Zauberspruch-Fragmente - diese benötigst du um die meisten Antiken Wunder auszubauen, je höher das Level desto mehr Zauberspruch-Fragmente sind erforderlich.
- Kombinationsauslöser - auch diese benötigst du um die meisten Antiken Wunder auszubauen, je höher das Level desto mehr Kombinationsauslöser sind erforderlich.
- Königliche Restauration - diese benötigst du für jeden fünften Level-Ausbau (in der Runen-Phase). je höher das Level desto mehr Königliche Restauration ist erforderlich. Ausgenommen hiervon sind die beiden ersten Antiken Wunder, die du im Forschungsbaum freischalten kannst.
| Bitte beachte: Jede Stufe eines Antiken Wunders erfordert Zauberspruch-Fragmente und Kombinationsauslöser als Ausbaukosten. Die Höhe der Kosten hängt von der zu verbessernden Stufe ab. Du kannst die Kosten in der Registerkarte "Ausbau" deines Antiken Wunders überprüfen. Jede Runenstufe (alle 5 Stufen) erfordert außerdem eine bestimmte Menge an Königlichen Restaurierungen, die wiederum von der Stufe des Antiken Wunders abhängt. |
Ausbaustufen
| Level 1 - 35 | |||||
|---|---|---|---|---|---|
 | |||||
| Hinweis: Das Glücksorakel hat in allen Levels eine Größe von 5x5 Feldern. Anklicken des Bildes zeigt eine vergrößerte Darstellung. | |||||