Antike Wunder der Konstrukte: Unterschied zwischen den Versionen
Zur Navigation springen


Blod89 (Diskussion | Beiträge) |
TiAnTi (Diskussion | Beiträge) (→Nutzen) |
||
| (9 dazwischenliegende Versionen von 2 Benutzern werden nicht angezeigt) | |||
| Zeile 6: | Zeile 6: | ||
[[file:portrait_aw_gr91.png|center]] <br> | [[file:portrait_aw_gr91.png|center]] <br> | ||
[[File:Construct_AW1_main.png|700px|center]] | [[File:Construct_AW1_main.png|700px|center]] | ||
=====Nutzen===== | |||
# [[File:sentientBoosted.png|30px]] Erhöht die Produktionssteigerung für deine Erweckten Güter | # [[File:sentientBoosted.png|30px]] Erhöht die Produktionssteigerung für deine Erweckten Güter | ||
# [[File:tournaments.png|30px]] Reduziert die Abklingzeit des Turniers. | # [[File:tournaments.png|30px]] Reduziert die Abklingzeit des Turniers. | ||
* Runenscherbe [[File:AW_Runeshard_ch14_1.png|25px]] | * Runenscherbe [[File:AW_Runeshard_ch14_1.png|25px]] | ||
Mouse Over D111-a "Zeitschleife" zeigt dir Informationen zu Gebäude Status und aktuellem Bonus/aktuellen Boni. . | |||
[[File:konstruke_aw_tooltip.jpg|center]] | [[File:konstruke_aw_tooltip.jpg|center]] | ||
<br> | <br> | ||
{{AncientWonders Level Benefits}} | |||
==== | =====Ausbau===== | ||
{{Ancient_Wonders_Upgrade}} | |||
=====Ausbaustufen===== | |||
{| align=center | {| align=center | ||
!Stufe 1 - 35 | !Stufe 1 - 35 | ||
| Zeile 435: | Zeile 25: | ||
|[[File:B_Gr9_AW1_1_0000.png|200px|center]] | |[[File:B_Gr9_AW1_1_0000.png|200px|center]] | ||
|- | |- | ||
|colspan="6" style="font-size:12px;text-align:center;"| | |colspan="6" style="font-size:12px;text-align:center;"| '''Hinweis:''' D111-a "Zeitschleife" hat in allen Levels eine Größe von 3x6 Feldern. Anklicken des Bildes zeigt eine vergrößerte Darstellung. | ||
|} | |} | ||
<br> | <br> | ||
==== D222-z "Simia Sapiens" ==== | ==== D222-z "Simia Sapiens" ==== | ||
Sobald du | Sobald du D222-z "Simia Sapiens" gebaut hast, erhältst du ein neues Porträt für dein Profil! | ||
[[file:portrait_aw_gr92.png|center]] <br> | [[file:portrait_aw_gr92.png|center]] <br> | ||
[[File:Construct_AW2_main.png|700px|center]] | [[File:Construct_AW2_main.png|700px|center]] | ||
=====Nutzen===== | |||
# [[File:Sentient_decay.png|25px]] Verringert den Zerfall von Erweckten Gütern. | # [[File:Sentient_decay.png|25px]] Verringert den Zerfall von Erweckten Gütern. | ||
# [[File:Barracks_boosted.png|25px]] Gibt jedes Mal zusätzliche Einheiten, wenn du sie aus deiner Kaserne, deinem Trainingsgelände oder Söldnerlager einsammelst. | # [[File:Barracks_boosted.png|25px]] Gibt jedes Mal zusätzliche Einheiten, wenn du sie aus deiner Kaserne, deinem Trainingsgelände oder Söldnerlager einsammelst. | ||
* Runenscherben: [[file:AW_Runeshard_ch14_2.png|25px]] | * Runenscherben: [[file:AW_Runeshard_ch14_2.png|25px]] | ||
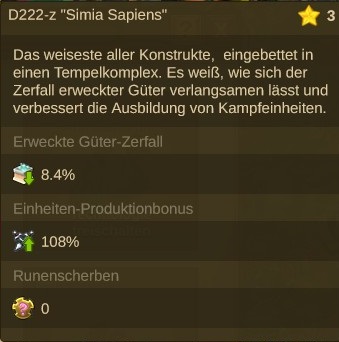
Mouse Over D222-z "Simia Sapiens" zeigt dir Informationen zu Gebäude Status und aktuellem Bonus/aktuellen Boni. | |||
[[File:konstrukte_AW2_tooltip. | [[File:konstrukte_AW2_tooltip.jpg|center]] | ||
<br> | <br> | ||
{{AncientWonders Level Benefits}} | |||
=====Ausbau===== | |||
{{Ancient_Wonders_Upgrade}} | |||
==== | =====Ausbaustufen===== | ||
{| align=center | {| align=center | ||
!Stufe 1 - 35 | !Stufe 1 - 35 | ||
| Zeile 872: | Zeile 52: | ||
|[[File:B_Gr9_AW2_1_0000.png|200px|center]] | |[[File:B_Gr9_AW2_1_0000.png|200px|center]] | ||
|- | |- | ||
|colspan="6" style="font-size:12px;text-align:center;"| | |colspan="6" style="font-size:12px;text-align:center;"| '''Hinweis:''' D222-z "Simia Sapiens" hat in allen Levels eine Größe von 6x5 Feldern. Anklicken des Bildes zeigt eine vergrößerte Darstellung. | ||
|} | |} | ||
Aktuelle Version vom 10. Februar 2024, 14:42 Uhr
|


Antike Wunder der Konstrukte

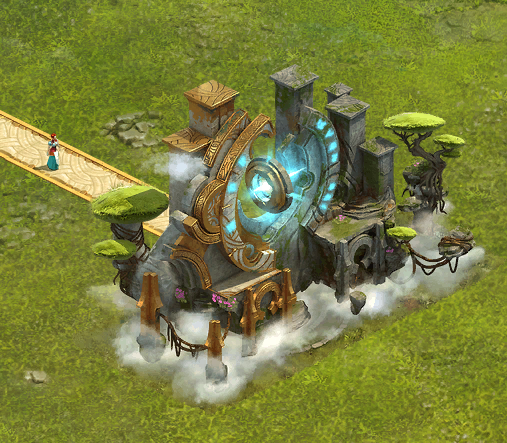
D111-a "Zeitschleife"
Sobald du den Bau der D111-a "Zeitschleife" beendet hast, bekommst du ein neues Porträt, das du in deinem Profil verwenden kannst!


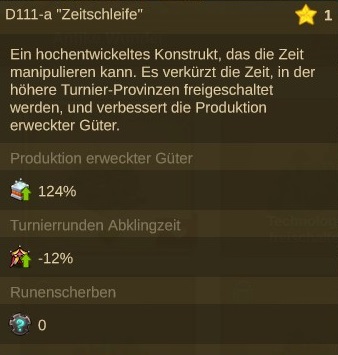
Nutzen
 Erhöht die Produktionssteigerung für deine Erweckten Güter
 Reduziert die Abklingzeit des Turniers.
- Runenscherbe

Mouse Over D111-a "Zeitschleife" zeigt dir Informationen zu Gebäude Status und aktuellem Bonus/aktuellen Boni. .

| Hinweis: Mit jeder Ausbaustufe wird dein Antikes Wunder mächtiger und liefert mehr Nutzen für deine Stadt. Klicke auf die Registerkarte Stufen, dort wird dir angezeigt, welche Nutzen der jeweilige Level bringt. |
Ausbau
Für den Ausbau eines Antiken Wunders benötigst du die folgenden Ressourcen:
 Wissenspunkte - diese benötigst du, um jedes Level eines Antiken Wunders zu erforschen, jedes Level benötigt eine größere Anzahl an Wissenspunkten, d.h. je höher das Level desto größer ist die erforderliche Investition.
 Zauberspruch-Fragmente - diese benötigst du um die meisten Antiken Wunder auszubauen, je höher das Level desto mehr Zauberspruch-Fragmente sind erforderlich.
 Kombinationsauslöser - auch diese benötigst du um die meisten Antiken Wunder auszubauen, je höher das Level desto mehr Kombinationsauslöser sind erforderlich.
 Königliche Restauration - diese benötigst du für jeden fünften Level-Ausbau (in der Runen-Phase). je höher das Level desto mehr Königliche Restauration ist erforderlich. Ausgenommen hiervon sind die beiden ersten Antiken Wunder, die du im Forschungsbaum freischalten kannst.
| Bitte beachte: Jede Stufe eines Antiken Wunders erfordert Zauberspruch-Fragmente und Kombinationsauslöser als Ausbaukosten. Die Höhe der Kosten hängt von der zu verbessernden Stufe ab. Du kannst die Kosten in der Registerkarte "Ausbau" deines Antiken Wunders überprüfen. Jede Runenstufe (alle 5 Stufen) erfordert außerdem eine bestimmte Menge an Königlichen Restaurierungen, die wiederum von der Stufe des Antiken Wunders abhängt. |
Ausbaustufen
| Stufe 1 - 35 | |||||
|---|---|---|---|---|---|
 | |||||
| Hinweis: D111-a "Zeitschleife" hat in allen Levels eine Größe von 3x6 Feldern. Anklicken des Bildes zeigt eine vergrößerte Darstellung. | |||||
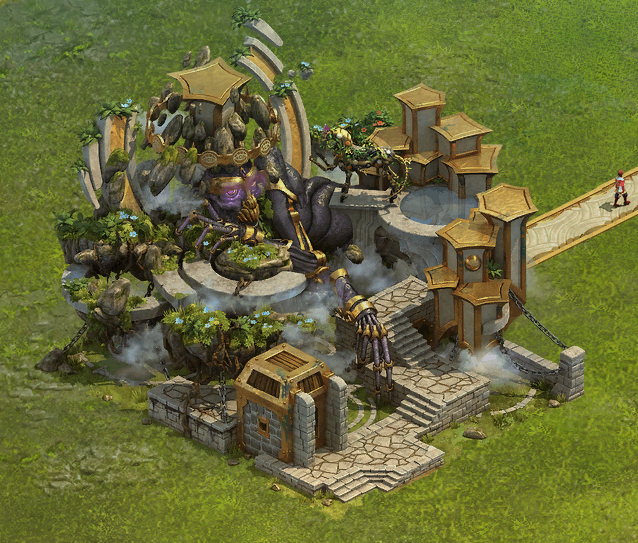
D222-z "Simia Sapiens"
Sobald du D222-z "Simia Sapiens" gebaut hast, erhältst du ein neues Porträt für dein Profil!


Nutzen
 Verringert den Zerfall von Erweckten Gütern.
 Gibt jedes Mal zusätzliche Einheiten, wenn du sie aus deiner Kaserne, deinem Trainingsgelände oder Söldnerlager einsammelst.
- Runenscherben:

Mouse Over D222-z "Simia Sapiens" zeigt dir Informationen zu Gebäude Status und aktuellem Bonus/aktuellen Boni.

| Hinweis: Mit jeder Ausbaustufe wird dein Antikes Wunder mächtiger und liefert mehr Nutzen für deine Stadt. Klicke auf die Registerkarte Stufen, dort wird dir angezeigt, welche Nutzen der jeweilige Level bringt. |
Ausbau
Für den Ausbau eines Antiken Wunders benötigst du die folgenden Ressourcen:
- Wissenspunkte - diese benötigst du, um jedes Level eines Antiken Wunders zu erforschen, jedes Level benötigt eine größere Anzahl an Wissenspunkten, d.h. je höher das Level desto größer ist die erforderliche Investition.
- Zauberspruch-Fragmente - diese benötigst du um die meisten Antiken Wunder auszubauen, je höher das Level desto mehr Zauberspruch-Fragmente sind erforderlich.
- Kombinationsauslöser - auch diese benötigst du um die meisten Antiken Wunder auszubauen, je höher das Level desto mehr Kombinationsauslöser sind erforderlich.
- Königliche Restauration - diese benötigst du für jeden fünften Level-Ausbau (in der Runen-Phase). je höher das Level desto mehr Königliche Restauration ist erforderlich. Ausgenommen hiervon sind die beiden ersten Antiken Wunder, die du im Forschungsbaum freischalten kannst.
| Bitte beachte: Jede Stufe eines Antiken Wunders erfordert Zauberspruch-Fragmente und Kombinationsauslöser als Ausbaukosten. Die Höhe der Kosten hängt von der zu verbessernden Stufe ab. Du kannst die Kosten in der Registerkarte "Ausbau" deines Antiken Wunders überprüfen. Jede Runenstufe (alle 5 Stufen) erfordert außerdem eine bestimmte Menge an Königlichen Restaurierungen, die wiederum von der Stufe des Antiken Wunders abhängt. |
Ausbaustufen
| Stufe 1 - 35 | |||||
|---|---|---|---|---|---|
 | |||||
| Hinweis: D222-z "Simia Sapiens" hat in allen Levels eine Größe von 6x5 Feldern. Anklicken des Bildes zeigt eine vergrößerte Darstellung. | |||||